最近在压测过程中,遇到了很多问题,也加深了自己对于程序性能包括CPU使用率,内存占用等各个指标的深入思考。测试同学在压测过程中主要考虑的是TPS,CPU使用率,延迟这几个指标。我们先介绍这个几个常用的性能指标,然后再进入我们的本文的正题,CPU的使用率是怎么来计算的,以及怎么来评估CPU的使用情况。
0x1 常用性能指标
TPS:Transactions Per Second,每秒处理事务数, 是衡量系统性能的一个非常重要的指标,按照TPS维基 的解释,一般用于每秒钟原子性操作的次数(事务最早是用于DBMS数据库的术语)。
QPS:Queries Per Second,每秒查询数,按照QPS维基 的解释,QPS是信息检索系统中常用的访问流量统计方式,例如搜索引擎,数据库等。现在更广泛的用于 request–response 系统,用RPS (Requests Per Second)更准确。
TPS和QPS的概念的区别在其不同的使用场景,网上看到很多强行解释两者之间的差别的文章,作为游戏服务器的后台开发,可以认为两者等同,我们压测过程中都是使用TPS来进行性能指标的衡量。
吞吐量:系统在单位时间内处理请求的数量,这个是一个很泛的术语,QPS,TPS都属于吞吐量的具体概念。
响应时间(延迟):一个请求从发送到接收到服务器端响应所经历的时间。
并发数:系统同时处理的请求数,对于后台server并发数取决于其线程数目,单线程的server其并发数就是1。
这里:QPS(TPS) = 并发数 / 响应时间。在响应时间不变的情况下,吞吐量和并发数成正比关系。但这是在服务器处理能力充足的情况下,当并发数达到一定程度(线程切换带来的开销),会导致吞吐量的下降和响应时间的增长。
0x2 CPU使用率 我们都知道进程的运行到机器层面都是指令的执行,由机器的大脑CPU来负责,我们在进行性能分析的时候,最常使用也是最直观的评判标准就是CPU的使用率。按照尝试如果我们写一段死循环代码,那么进程执行时肯定时占用100%的CPU,那如果如下一段代码呢:
1 2 3 4 5 6 7 8 9 10 11 12 13 void fun_array () uint32_t a[5 ] = {1 ,2 ,3 ,4 ,5 }; while (true ) { for (uint32_t loop_i = 0 ; loop_i < 1000000 ; ++loop_i) { uint32_t b = a[loop_i % 5 ]; } usleep (10 *1000 ); } }
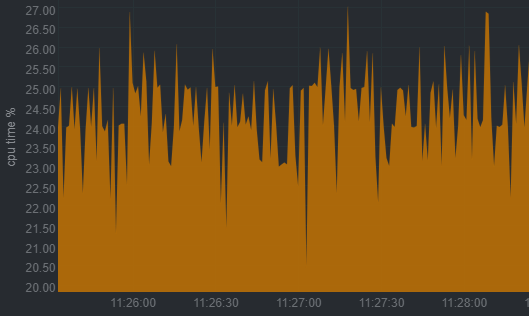
下面是 Intel(R) Xeon(R) CPU E5-26xx v3 2394MHZ的CPU使用率如下:
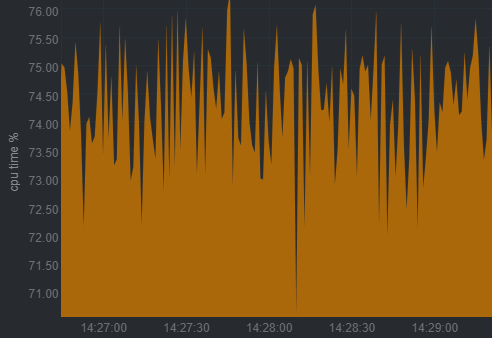
当把loop循环中的1000000改成10000000后,CPU使用率如下:
可以看到CPU使用率从25%左右涨到了75%左右,由上面的测试代码可知,如果我们的main loop中处理业务逻辑消耗太多CPU时间时,无论你有没有sleep,都会使CPU的使用率上升.
我们思考一下我们的框架是怎么设计的?正常的做法都是,在main loop中,依次处理请求,内部事件等,如果单次loop中没有处理请求就在loop的结尾sleep一定时间,sleep的时间决定了可能会延迟的时间,如下:
1
2
3
4
5
6
7
8
9
10
11
12
13
14
15
16
17
int main () ... while (is_stop) { int deal_count = handler_request (); handler_event (); ... if (!deal_count) usleep (10 *1000 ) } ... }
所以在设计后台框架的时候,要保证每个模块的处理时间得到有效的控制,否则会使服务的整体吞吐量严重下降。那么我们常用的top命令显示时的CPU使用率时如何进行统计的呢?
0x3 CPU使用率的统计方法 linux的top命令的CPU使用率的实现是通过读取/proc/stat和/proc/PID/stat文件来实现的,top命令是属于procps工具集,procps工具集包含一系列命令:top,free,ps,kill等,源码可以参考sourceforge ,github ,gitlab .
我们知道/proc文件系统存储的是当前内核运行状态,包括硬件信息,进程的运行信息等特殊文件。它也是一个和内核数据结构交互的简单接口,可以通过修改一些文件来变更内核的运行。每个进程的/proc/PID/stat文件保存着当前进程的状态信息,是格式化后的数据列,可读性差,通常由ps命令使用。我们看一下1号进程的stat文件:
1
2
$ cat /proc/1/stat1 (systemd) S 0 1 1 0 -1 4202752 3385037 353960800375 8282 5510369 144301 21401 4130684911 245279439 20 0 1 0 2 46133248 564 18446744073709551615 1 1 0 0 0 0 671173123 4096 1260 18446744073709551615 0 0 17 0 0 0 68603 0 0 0 0 0 0 0 0 0 0
具体每个字段的含义可参考kernel documents ,这里我写了一个脚本 来读取stat的数据,来便于读取,通过脚本的输出结果如下:
1
2
3
4
5
6
7
8
9
10
11
12
13
14
15
16
17
18
19
20
$ ./proc_stat.sh 1 1 pid process id (systemd) tcomm filename of the executable S state state (R is running, S is sleeping, D is sleeping in an uninterruptible wait, Z is zombie, T is traced or stopped) 0 ppid process id of the parent process 1 pgrp pgrp of the process 1 sid session id 0 tty_nr tty the process uses -1 tty_pgrp pgrp of the tty 4202752 flags task flags 3385149 min_flt number of minor faults 353960834104 cmin_flt number of minor faults with child's 8282 maj_flt number of major faults 5510372 cmaj_flt number of major faults with child's 144309 utime user mode jiffies 21402 stime kernel mode jiffies 4130684922 cutime user mode jiffies with child's 245279454 cstime kernel mode jiffies with child's ...省略
每个进程的CPU使用率是通过stat中的四个参数: utime,stime,cutime,cstime来进行计算的,前面两个参数是进程的用户态和内核态的CPU使用时间,后面两个是子线程的CPU使用时间。进程的CPU时间
$$源码地址 。
1
2
3
4
5
6
7
8
9
10
11
12
13
14
15
16
17
18
19
20
21
22
23
24
25
26
27
28
29
30
31
32
33
34
35
36
37
38
39
40
41
42
43
44
45
46
def cpu_percent (self, interval=None ): ''' ... ''' blocking = interval is not None and interval > 0.0 if interval is not None and interval < 0 : raise ValueError("interval is not positive (got %r)" % interval) num_cpus = cpu_count() or 1 def timer (): return _timer() * num_cpus if blocking: st1 = timer() pt1 = self._proc.cpu_times() time.sleep(interval) st2 = timer() pt2 = self._proc.cpu_times() else : st1 = self._last_sys_cpu_times pt1 = self._last_proc_cpu_times st2 = timer() pt2 = self._proc.cpu_times() if st1 is None or pt1 is None : self._last_sys_cpu_times = st2 self._last_proc_cpu_times = pt2 return 0.0 delta_proc = (pt2.user - pt1.user) + (pt2.system - pt1.system) delta_time = st2 - st1 self._last_sys_cpu_times = st2 self._last_proc_cpu_times = pt2 try : overall_cpus_percent = ((delta_proc / delta_time) * 100 ) except ZeroDivisionError: return 0.0 else : single_cpu_percent = overall_cpus_percent * num_cpus return round (single_cpu_percent, 1 )
我们看到cpu_percent提供了传入统计间隔的interval参数,可以方便单个进程的统计,或者整体系统所有进程的统计。为了统计的准确性,cpu_percent的调用间隔至少要有0.1s,我们知道top命令的统计间隔时间默认是1.5s。
0x4 CPU使用率的控制方法 下面我们看一下如何来进行CPU使用率的控制,我们知道linux下的两个信号是不能被进程忽略的:SIGKILL和SIGSTOP,这两个信号向超级用户提供了使进程终止或停止的方法。所以可以通过SIGSTOP和SIGCONT两个信号来对进程的CPU使用进行控制。如下示例简单代码github地址 :
1
2
3
4
5
6
7
8
9
10
11
12
13
14
15
16
17
18
19
20
21
22
def cpu_utilization_control (pid, cpu_util ): total_time = 1000 run_time = total_time * cpu_util / 100.0 sleep_time = total_time - run_time print run_time, sleep_time t1 = time.time() * 1000 while True : t2 = time.time() * 1000 delta_time = t2 - t1 if delta_time >= run_time: os.kill(pid, signal.SIGSTOP) sleep_ms = sleep_time / 1000.0 time.sleep(sleep_ms) os.kill(pid, signal.SIGCONT) t1 = time.time() * 1000 else : sleep_ms = (run_time - delta_time) / 1000.0 time.sleep(sleep_ms)
下面是一段死循环的代码,可以看到CPU跑满了(单核机器):
通过上面的脚本进行控制使其CPU占用率为50%的结果:
参考
衡量网站性能时,并发数与吞吐量为何要分别考量? 防雪崩利器:熔断器 Hystrix 的原理与使用 https://www.kernel.org/doc/Documentation/filesystems/proc.txt http://procps.sourceforge.net https://github.com/mmalecki/procps https://gitlab.com/procps-ng/procps https://github.com/mmalecki/procps/blob/master/proc/readproc.c


